AWS Data Stores
Robust Intelligence supports loading data directly from AWS. Today, S3 is the only natively supported Cloud Store. Configure AWS Data Stores using the UI.
Configuring AWS Data Store Integration
To integrate Robust Intelligence with an AWS Data Store, you must configure one of the following authentication methods:
See the relevant steps for your approach below.
After you’ve configured your AWS data store integration, see Using the AWS Integration for help registering your datasets and models.
Access Key-Based Authentication
In order to configure an AWS Data Store that Robust Intelligence will connect to using access key-based authentication, follow the steps below. This procedure will provide the Access Key ID and Secret Access Key that you need when you create the Robust Intelligence-ASW integration.
You can learn more about access key based authentication in the AWS document, AWS Account and Access Keys
Procedure:
Create or find the AWS bucket that your Robust Intelligence instance will use. This will serve as the agent’s default data source. See the AWS document, Creating a bucket.
Create a policy to get and list objects for the designated S3 bucket. This will be similar to the policy shown here:
{
  "Version": "2012-10-17",
  "Statement": [
      {
          "Effect": "Allow",
          "Action": [
              "s3:ListBucket"
          ],
          "Resource": "arn:aws:s3:::<YOUR_BUCKET>"
      },
      {
          "Effect": "Allow",
          "Action": [
              "s3:GetObject"
          ],
          "Resource": "arn:aws:s3:::<YOUR_BUCKET>/*"
      }
  ]
}
Add the policy to the relevant user group. See the AWS document, Attaching a policy to an IAM user group
Note: If you do not want to create a new user, proceed to Step 5.
If needed, add and/or create users in this user group. See the AWS document on Adding and removing users
Get the access key as explained in the AWS document, Get your access key ID and secret access key.
Once you have the access key:
If you did not create a new user, then copy the Access Key ID and Secret Access Key. You’ll need these when you configure the integration in the next step.
If you did create a new user, then you must create the access key for the new user. See the section, “To create an access key” in the AWS document, Managing access keys.
Add your AWS integration through the Robust Intelligence UI: Workspace: Integrations: Add.
IAM Role-Based Authentication
In order to configure an AWS Data Store that Robust Intelligence will connect to using IAM role-based authentication, follow the steps below. This procedure will provide the AWS Role ARN that you will need when you create the Robust Intelligence-AWS integration. Learn more about IAM role-based access in the AWS document, Configuring a Kubernetes service account to assume an IAM role.
Note: Integrations support authenticating using AWS Role ARN in the same way when deploying the Robust Intelligence Agent.
Procedure:
Create or find the AWS bucket that your Robust Intelligence instance will use. For information, see the AWS document, Creating a bucket.
If not already configured for your cluster, create an IAM OpenID Connect (OIDC) provider that will enable your cluster to use IAM roles for service accounts. See the AWS document, Creating an IAM OIDC provider for your cluster
For the designated S3 bucket, create an access policy that allows listing and reading objects:
{
  "Version": "2012-10-17",
  "Statement": [
      {
          "Effect": "Allow",
          "Action": [
              "s3:ListBucket"
          ],
          "Resource": "arn:aws:s3:::<YOUR_BUCKET>"
      },
      {
          "Effect": "Allow",
          "Action": [
              "s3:GetObject"
          ],
          "Resource": "arn:aws:s3:::<YOUR_BUCKET>/*"
      }
  ]
}
Create an IAM role that the two K8s service accounts (see top of page) can assume, and associate it with the policy created in the previous step.
Save this ARN. You will need to specify this during the Robust Intelligence integration setup step.
Create a trust relationship to allow the two K8s service accounts to assume the IAM role. See the AWS document, Configuring a K8s service account to assume an IAM role
Your trust relationship should have a similar definition as the template shown below. Note the two K8s service accounts in the subject field.
Note: You do not need to update the service account
rime-agent-model-testerandrime-agent-rime-cross-plane-serverwith the new Role ARN as this will be populated at runtime when the integration is used.{ "Version": "2012-10-17", "Statement": [ { "Effect": "Allow", "Principal": { "Federated": "arn:aws:iam::111122223333:oidc-provider/oidc.eks.region-code.amazonaws.com/id/EXAMPLED539D4633E53DE1B71EXAMPLE" }, "Action": "sts:AssumeRoleWithWebIdentity", "Condition": { "StringEquals": { "oidc.eks.region-code.amazonaws.com/id/EXAMPLED539D4633E53DE1B71EXAMPLE:sub": [ "system:serviceaccount:$AGENT_NAMESPACE:rime-agent-rime-cross-plane-server", "system:serviceaccount:$AGENT_NAMESPACE:rime-agent-model-tester" ] } } } ] }
See also the AWS document, Configuring role and service account.
Add your AWS integration through the Robust Intelligence UI: Workspace: Integrations: Add.
IAM Cross-Account Access
If your data resides in an S3 bucket owned by a user other than the main AWS service account you use for your Robust Intelligence-to-S3 data integration, then you can use IAM cross-account access to load that data. The steps below explain how to set this up.
Note
The steps below are based on the cross-account permissions walkthrough in the AWS documentation.
Overview
In these instructions, we’ll use the following example account names:
Account A is the AWS account that owns the S3 bucket whose data you wish to load.
Account B is the AWS account of the user who wants to load data for test runs in Robust Intelligence. A user in this account will be set up as the Robust Intelligence integration service account as explained in IAM Role-Based Authentication.
Procedure
Create a role in Account B and give it the permissions to be received from Account A:
Sign in as an administrator of Account B (the account that wants access to the data).
Create a role that will be granted the bucket access permissions received from Account A. Here we give our example role the name,
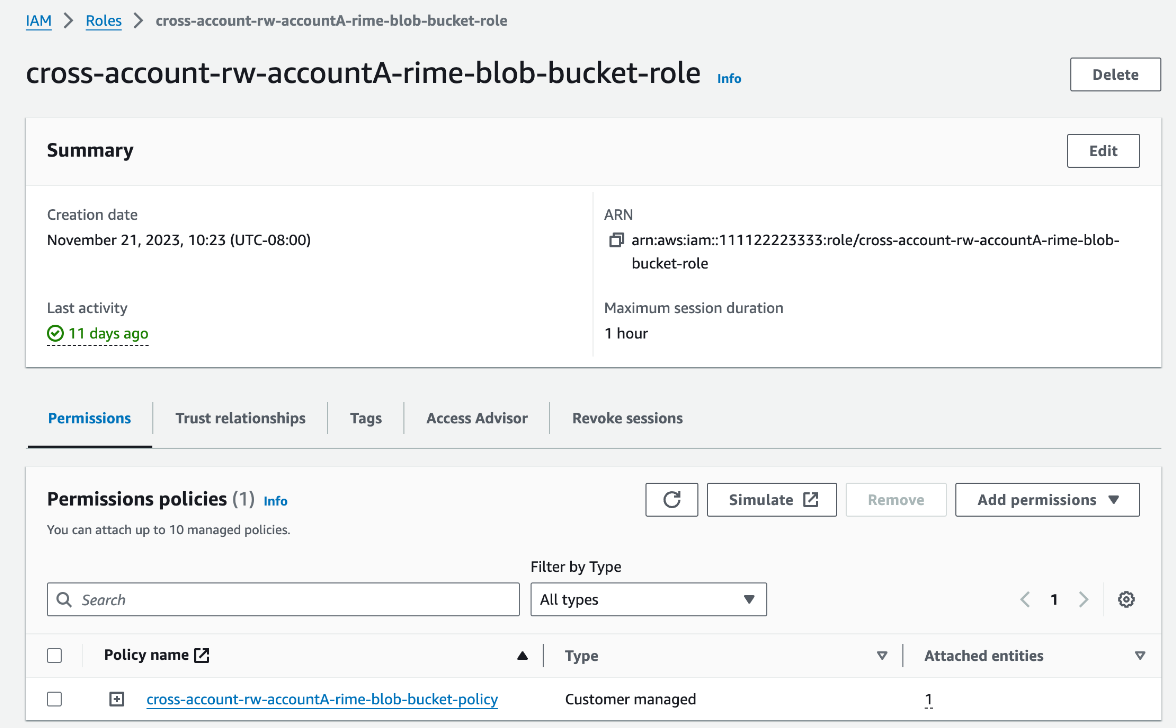
cross-account-rw-accountA-rime-blob-bucket-role.Create an inline policy for this role, granting permission to perform the actions
s3:ListBucket,s3:GetBucketLocation,s3:GetObject,s3:PutObject, ands3:DeleteObjecton the bucket. Here, we use the example bucket ARN,arn:aws:s3:::accountA-rime-blob-bucket. Replace this with your bucket’s ARN.{ "Version": "2012-10-17", "Statement": [ { "Effect": "Allow", "Action": [ "s3:ListBucket", "s3:GetBucketLocation" ], "Resource": "arn:aws:s3:::accountA-rime-blob-bucket" }, { "Effect": "Allow", "Action": [ "s3:GetObject", "s3:PutObject", "s3:DeleteObject" ], "Resource": "arn:aws:s3:::accountA-rime-blob-bucket/*" } ] }
You can view the role and its access policy in the AWS Console:
Create a bucket policy that grants Account B access to Account A’s bucket:
Using the IAM user sign-in URL for Account A, first sign in to the AWS Management Console as an admin user.
Attach a bucket policy (see example below) to the bucket to grant Account B permission to perform the actions
s3:ListBucket,s3:GetBucketLocation,s3:GetObject,s3:PutObject, ands3:DeleteObject. Specifically, grant the permissions to the role you defined earlier in Account B (which uses the example account ID,111122223333). Replace the example bucket ARN,arn:aws:s3:::accountA-rime-blob-bucket, with your bucket’s ARN.{ "Version": "2012-10-17", "Statement": [ { "Principal": { "AWS": "arn:aws:iam::111122223333:role/cross-account-rw-accountA-rime-blob-bucket-role" }, "Effect": "Allow", "Action": [ "s3:ListBucket", "s3:GetBucketLocation" ], "Resource": "arn:aws:s3:::accountA-rime-blob-bucket" }, { "Principal": { "AWS": "arn:aws:iam::111122223333:role/cross-account-rw-accountA-rime-blob-bucket-role" }, "Effect": "Allow", "Action": [ "s3:GetObject", "s3:PutObject", "s3:DeleteObject" ], "Resource": "arn:aws:s3:::accountA-rime-blob-bucket/*" } ] }
Use the AWS CLI to verify that the policy is working and allows an admin user in Account B (user
AccountBadminin this example) to list the bucket’s contents. In Account B, switch to the IAM role you created for the bucket access (see the AWS instructions, Switching to an IAM role). Then test that you can access Account A’s bucket. Here, we show the example bucket,accountA-rime-blob-bucket:aws s3 ls s3://accountA-rime-blob-bucket
Create an AWS S3 Integration in Robust Intelligence using the role you just created. For instructions, see IAM Role-Based Authentication, above.
Once you’ve created the integration, you can use it as explained in Using the AWS Integration.
Using the AWS Integration
After configuring the integration, use it to register datasets and models. When registering datasets, the path field can point to files of type csv, Parquet, jsonl, jsonl.gz, and json.gz. In this case, data_type does not need to be specified and defaults to "DATA_TYPE_UNSPECIFIED".
integration_id = "abe23******" #Choose the AWS Integration ID

project.register_dataset(
    name= f"ref_data_{dt}",
    data_config= {
        "connection_info": {
            "data_file": {
                "path": "s3://rime-blob-integration/data/fraud_ref.csv" #Enter the s3 file path
            }
        },
        "data_params": {"label_col": "label"}
    },
    integration_id= integration_id
)

model_id = project.register_model(
    name= f"model_{dt}",
    model_config= {
        "model_path": {
            "path": "s3://rime-blob-integration/models/fraud_model.py" #Enter the s3 file path
        }
    },
    integration_id= integration_id
)
The AWS integration can also be used to register a Delta lake table on
S3. The path mush point to the S3 folder where the Delta lake table
exists and the "data_type": "DATA_TYPE_DELTA_TABLE" must be
specified.
integration_id = "abe23******" #Choose the AWS Integration ID

project.register_dataset(
    name= f"ref_data_{dt}",
    data_config= {
        "connection_info": {
            "data_file": {
                "path": "s3://rime-blob-integration/data/delta_table/fraud_ref", #Enter the delta table path on s3
                "data_type": "DATA_TYPE_DELTA_TABLE"
            }
        },
        "data_params": {"label_col": "label"}
    },
    integration_id= integration_id
)
More information on defining the configurations is available in the Data Configuration section.