RI Lending Classification Walkthrough
▶️ Try this in Colab! Run the RI Lending Classification Walkthrough in Google Colab.
You are a data scientist at a Bank. The data science team has been tasked with implementing a binary classification model to predict whether an individual will default on a loan. The goal of this project is two-fold: we want to monitor how that model performs over time as well as ensure that the model is compliant with financial regulations. In order to accomplish the latter, we will be testing whether the model is biased against certain protected features. One could imagine such models being used downstream for various purposes, such as loan approval or funding allocation. A biased model could yield disadvantageous outcomes for protected groups. For instance, we may find that an individual with a specific race or race/gender combination causes the model to consistently predict a higher probability of them defaulting, causing a higher rate of loan rejection.
In this Notebook Walkthrough, we will walkthrough our core products of AI Stress Testing and AI Continuous Testing in a Bias and Fairness setting. RIME AI Stress Testing allows you to test the developed model and datasets. With this compliance-focused setting, you will be able to verify your AI model for bias and fairness issues. RIME AI Continuous Testing allows you to continue monitoring your deployed model for bias.
Install Dependencies, Import Libraries and Download Data
Run the cell below to install libraries to recieve data, install our SDK, and load analysis libraries.
[ ]:
!pip install rime-sdk &> /dev/null
[ ]:
import pandas as pd
from pathlib import Path
from rime_sdk import Client
[ ]:
!pip install https://github.com/RobustIntelligence/ri-public-examples/archive/master.zip
from ri_public_examples.download_files import download_files
download_files('tabular-2.0/lending', 'lending')
Establish the RIME Client
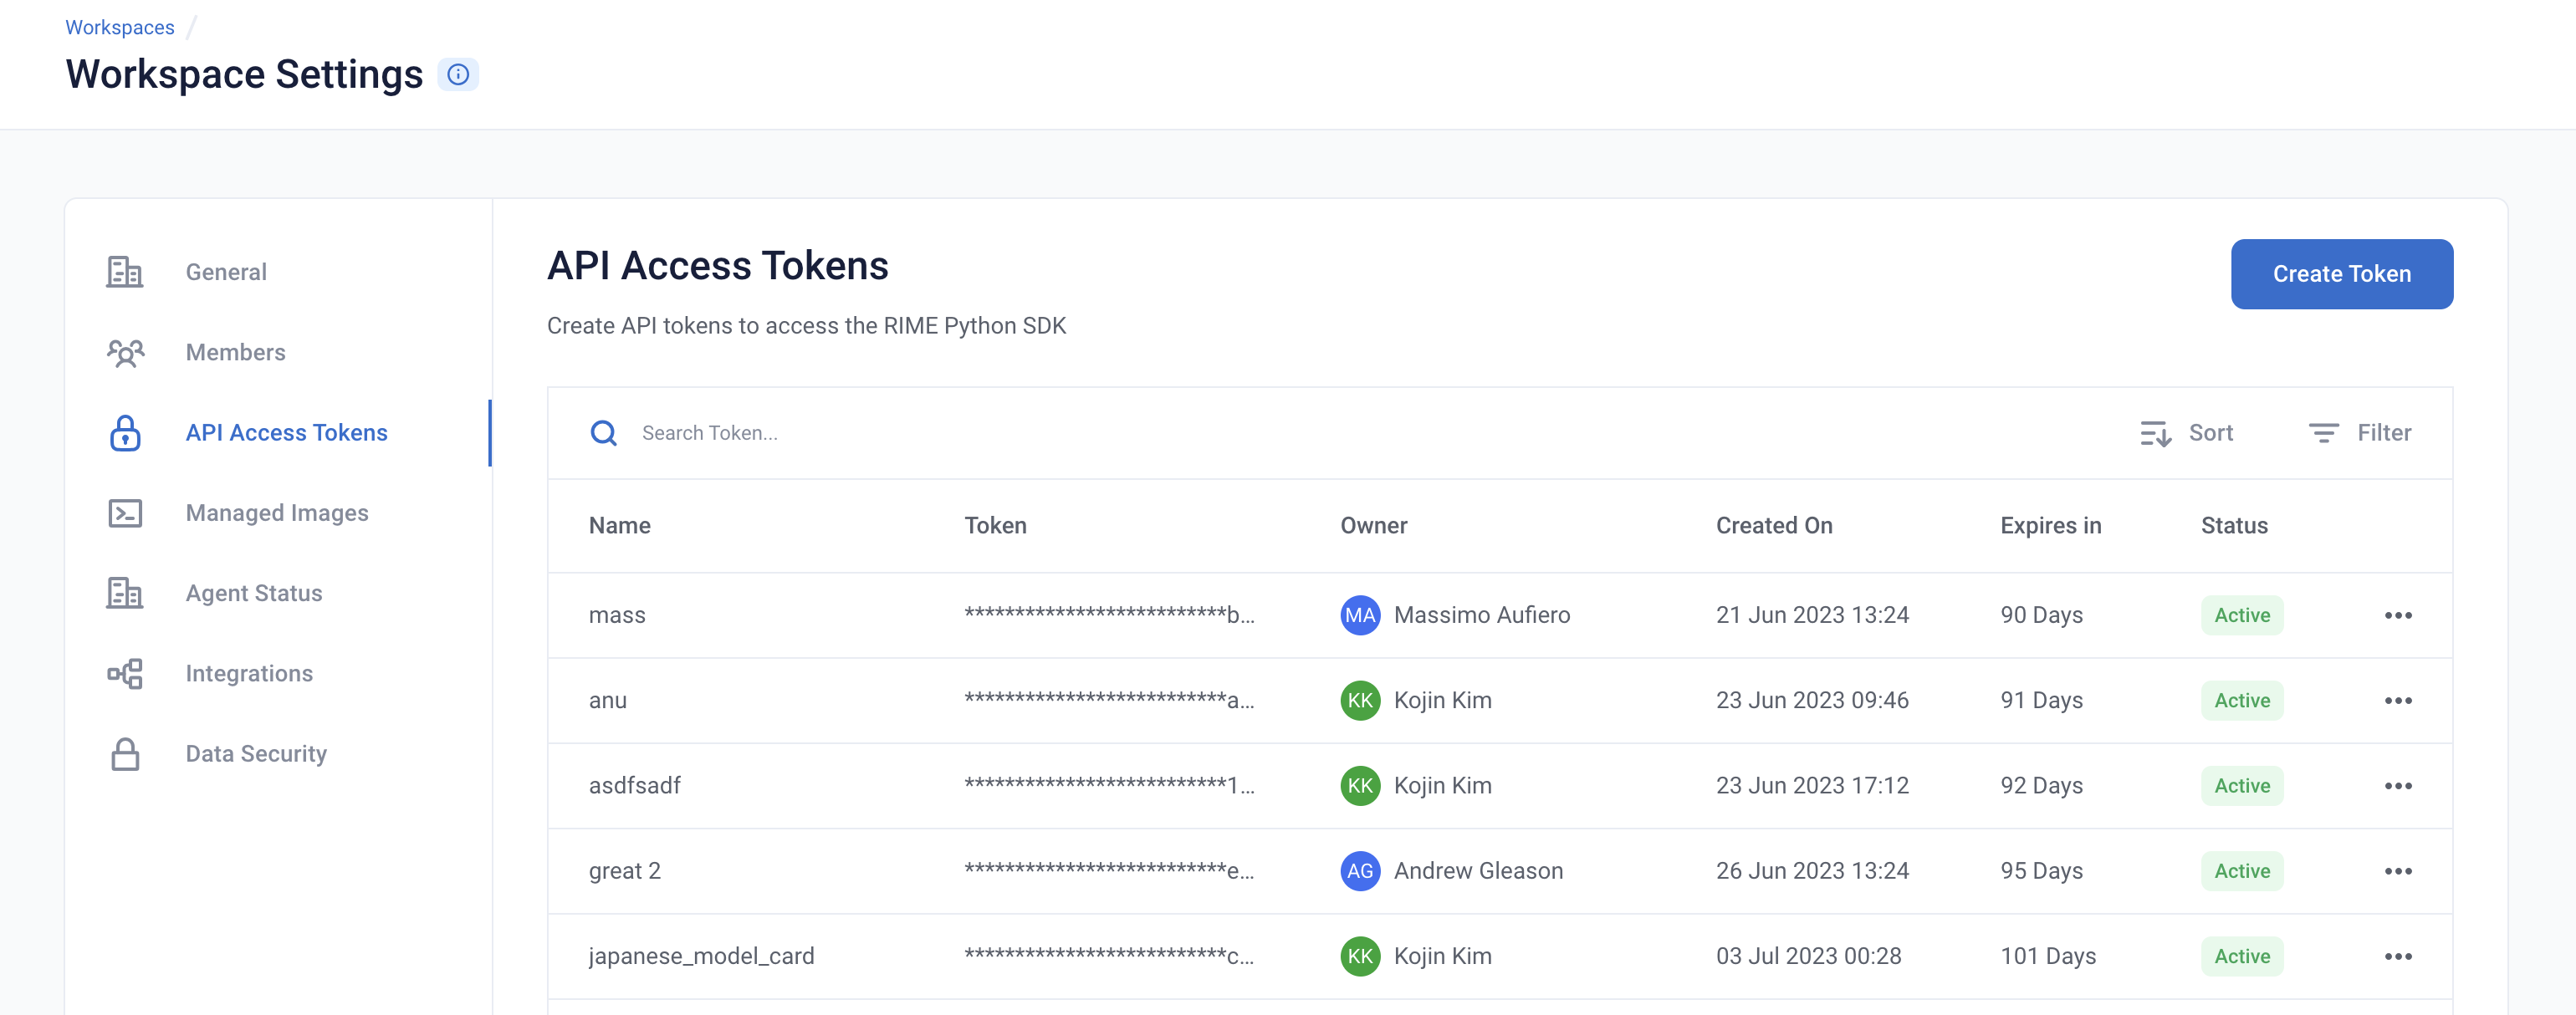
To get started, provide the API credentials and the base domain/address of the RIME service. You can generate and copy an API token from the API Access Tokens Page under Workspace settings. For the domian/address of the RIME service, contact your admin.

[ ]:
API_TOKEN = '' # PASTE API_KEY
CLUSTER_URL = '' # PASTE DEDICATED DOMAIN OF RIME SERVICE (e.g., https://rime.example.rbst.io)
AGENT_ID = '' # PASTE AGENT_ID IF USING AN AGENT THAT IS NOT THE DEFAULT
[ ]:
client = Client(CLUSTER_URL, API_TOKEN)
Create a New Project
You can create projects in RIME to organize your test runs. Each project represents a workspace for a given machine learning task. It can contain multiple candidate models, but should only contain one promoted production model.
[ ]:
description = (
    "Run Stress Testing and Continuous Testing on a tabular"
    " binary classification model and dataset."
    " Demonstration uses the Lending Club dataset, which is used"
    " to predict whether someone will repay a loan."
)
project = client.create_project(
    name="Lending Classification Continuous Testing Demo",
    description=description,
    model_task="MODEL_TASK_BINARY_CLASSIFICATION"
)
[ ]:
project.project_id
Go back to the UI to see the new ``Lending Classification Continuous Testing Demo`` project.
Training a Lending Model and Uploading the Model + Datasets
Let’s first take a lot at what the dataset looks like. We can observe that the data consists of a mix of categorical and numeric features.
[ ]:
pd.read_csv('lending/data/ref.csv').head()
For this demo, we are going to use a pretrained CatBoostClassifier Model.
The model predicts whether an individual will default on their loan.
We now want to kick off RIME Stress Tests, in a compliance setting, that will help us determine if the model is biased against protected attributes. In order to do this, we will upload this pre-trained model, the reference dataset the model was trained on, and the evaluation dataset the model was evaluated on to an S3 bucket that can be accessed by RIME.
Uploading Artifacts to Blob Storage
For SaaS environments using the default S3 storage location, the Python SDK supports direct file uploads using upload_*().
For other environments and storage technologies, artifacts must be managed through alternate means.
[ ]:
IS_SAAS = False # TOGGLE True/False (Note: SaaS environments use URLs ending in "rbst.io" and have an "Internal Agent")
[ ]:
if not IS_SAAS:
    BLOB_STORE_URI = "" # PROVIDE BLOB STORE URI (e.g., "s3://acmecorp-rime")
    assert BLOB_STORE_URI != ""

UPLOAD_PATH = "ri_public_examples_lending"
If your environment is not SaaS (or if you are using a storage mechanism other than AWS S3), be sure to upload the example artifacts before proceeding!
If your environment is SaaS, the cell below will automatically upload the example artifacts for you.
[ ]:
if IS_SAAS:
    model_s3_dir = client.upload_directory(
        Path('lending/models'), upload_path=UPLOAD_PATH
    )
    model_s3_path = model_s3_dir + "/model.py"

    ref_s3_path = client.upload_file(
        Path('lending/data/ref.csv'), upload_path=UPLOAD_PATH
    )
    eval_s3_path = client.upload_file(
        Path('lending/data/eval.csv'), upload_path=UPLOAD_PATH
    )

    ref_preds_s3_path = client.upload_file(
        Path("lending/data/ref_preds.csv"), upload_path=UPLOAD_PATH
    )
    eval_preds_s3_path = client.upload_file(
        Path("lending/data/eval_preds.csv"), upload_path=UPLOAD_PATH
    )
else:
    model_s3_path = f"{BLOB_STORE_URI}/{UPLOAD_PATH}/models/model.py"

    ref_s3_path = f"{BLOB_STORE_URI}/{UPLOAD_PATH}/data/ref.csv"
    eval_s3_path = f"{BLOB_STORE_URI}/{UPLOAD_PATH}/data/eval.csv"

    ref_preds_s3_path = f"{BLOB_STORE_URI}/{UPLOAD_PATH}/data/ref_preds.csv"
    eval_preds_s3_path = f"{BLOB_STORE_URI}/{UPLOAD_PATH}/data/eval_preds.csv"
Once the data and model are uploaded to S3, we can register them to RIME. In this bias and fairness setting, we require some additional information when registering datasets. Within the data_params parameter in the registering function, we include the protected features present in the data such that we can run our bias and fairness tests on those features. Once the datasets and models are registered, we can refer to these resources using their RIME-generated ID’s.
[ ]:
from datetime import datetime

dt = str(datetime.now())

# Note: models and datasets need to have unique names.
model_id = project.register_model_from_path(f"model_{dt}", model_s3_path, agent_id=AGENT_ID)

ref_dataset_id = project.register_dataset_from_file(
    f"ref_dataset_{dt}",
    ref_s3_path,
    data_params={
        "label_col": "loan_status",
        "protected_features": ["sex", "race", "addr_state"]
    },
    agent_id=AGENT_ID
)
eval_dataset_id = project.register_dataset_from_file(
    f"eval_dataset_{dt}",
    eval_s3_path,
    data_params={
        "label_col": "loan_status",
        "protected_features": ["sex", "race", "addr_state"]
    },
    agent_id=AGENT_ID
)

ref_pred_id = project.register_predictions_from_file(
    ref_dataset_id, model_id, ref_preds_s3_path, agent_id=AGENT_ID
)
eval_pred_id = project.register_predictions_from_file(
    eval_dataset_id, model_id, eval_preds_s3_path, agent_id=AGENT_ID
)
Running a Stress Test with Bias and Fairness
AI Stress Tests allow you to test your data and model before deployment. They are a comprehensive suite of hundreds of tests that automatically identify implicit assumptions and weaknesses of pre-production models. Each stress test is run on a single model and its associated reference and evaluation datasets.
To run Stress Tests with the Bias & Fairness mode, there are two main changes to make. The first has been done already, namely specifying a set of protected_features in the data_param parameters of both datasets. The protected features are the specific features that you want Stress Tests to run over in order to test your model for signs of bias. Additionally, you will want to specify the Bias and Fairness Category in stress test config. This category does not run by default so specifying
as such is necessary:
stress_test_config = {
        # rest of configuration ...
        "categories": ["TEST_CATEGORY_TYPE_BIAS_AND_FAIRNESS"]
}
Note how the “categories” field contains “Bias and Fairness”, along with other categories to test Security and Operational Risk.
Below is a sample configuration of how to setup and run a RIME Stress Test.
[ ]:
stress_test_config = {
    "data_info": {
        "ref_dataset_id": ref_dataset_id,
        "eval_dataset_id": eval_dataset_id
    },
    "model_id": model_id,
    "run_name": "Loan Default Prediction - Lending Club",
    "categories": [
            "TEST_CATEGORY_TYPE_ADVERSARIAL",
            "TEST_CATEGORY_TYPE_SUBSET_PERFORMANCE",
            "TEST_CATEGORY_TYPE_TRANSFORMATIONS",
            "TEST_CATEGORY_TYPE_BIAS_AND_FAIRNESS",
            "TEST_CATEGORY_TYPE_ABNORMAL_INPUTS",
            "TEST_CATEGORY_TYPE_DATA_CLEANLINESS"
    ]
}
stress_job = client.start_stress_test(test_run_config=stress_test_config, project_id=project.project_id, agent_id=AGENT_ID)
stress_job.get_status(verbose=True, wait_until_finish=True)
Wait for a couple minutes and your results will appear in the UI.
Stress Test Results
Stress tests are tests are grouped first by risk categories and then into categories that measure various aspects of model robustness (model behavior, distribution drift, abnormal input, transformations, adversarial attacks, bias and fairness). Key insights to improve your model are aggregated on the category level as well. Tests are ranked by default by a shared severity metric. Clicking on an individual test surfaces more detailed information.
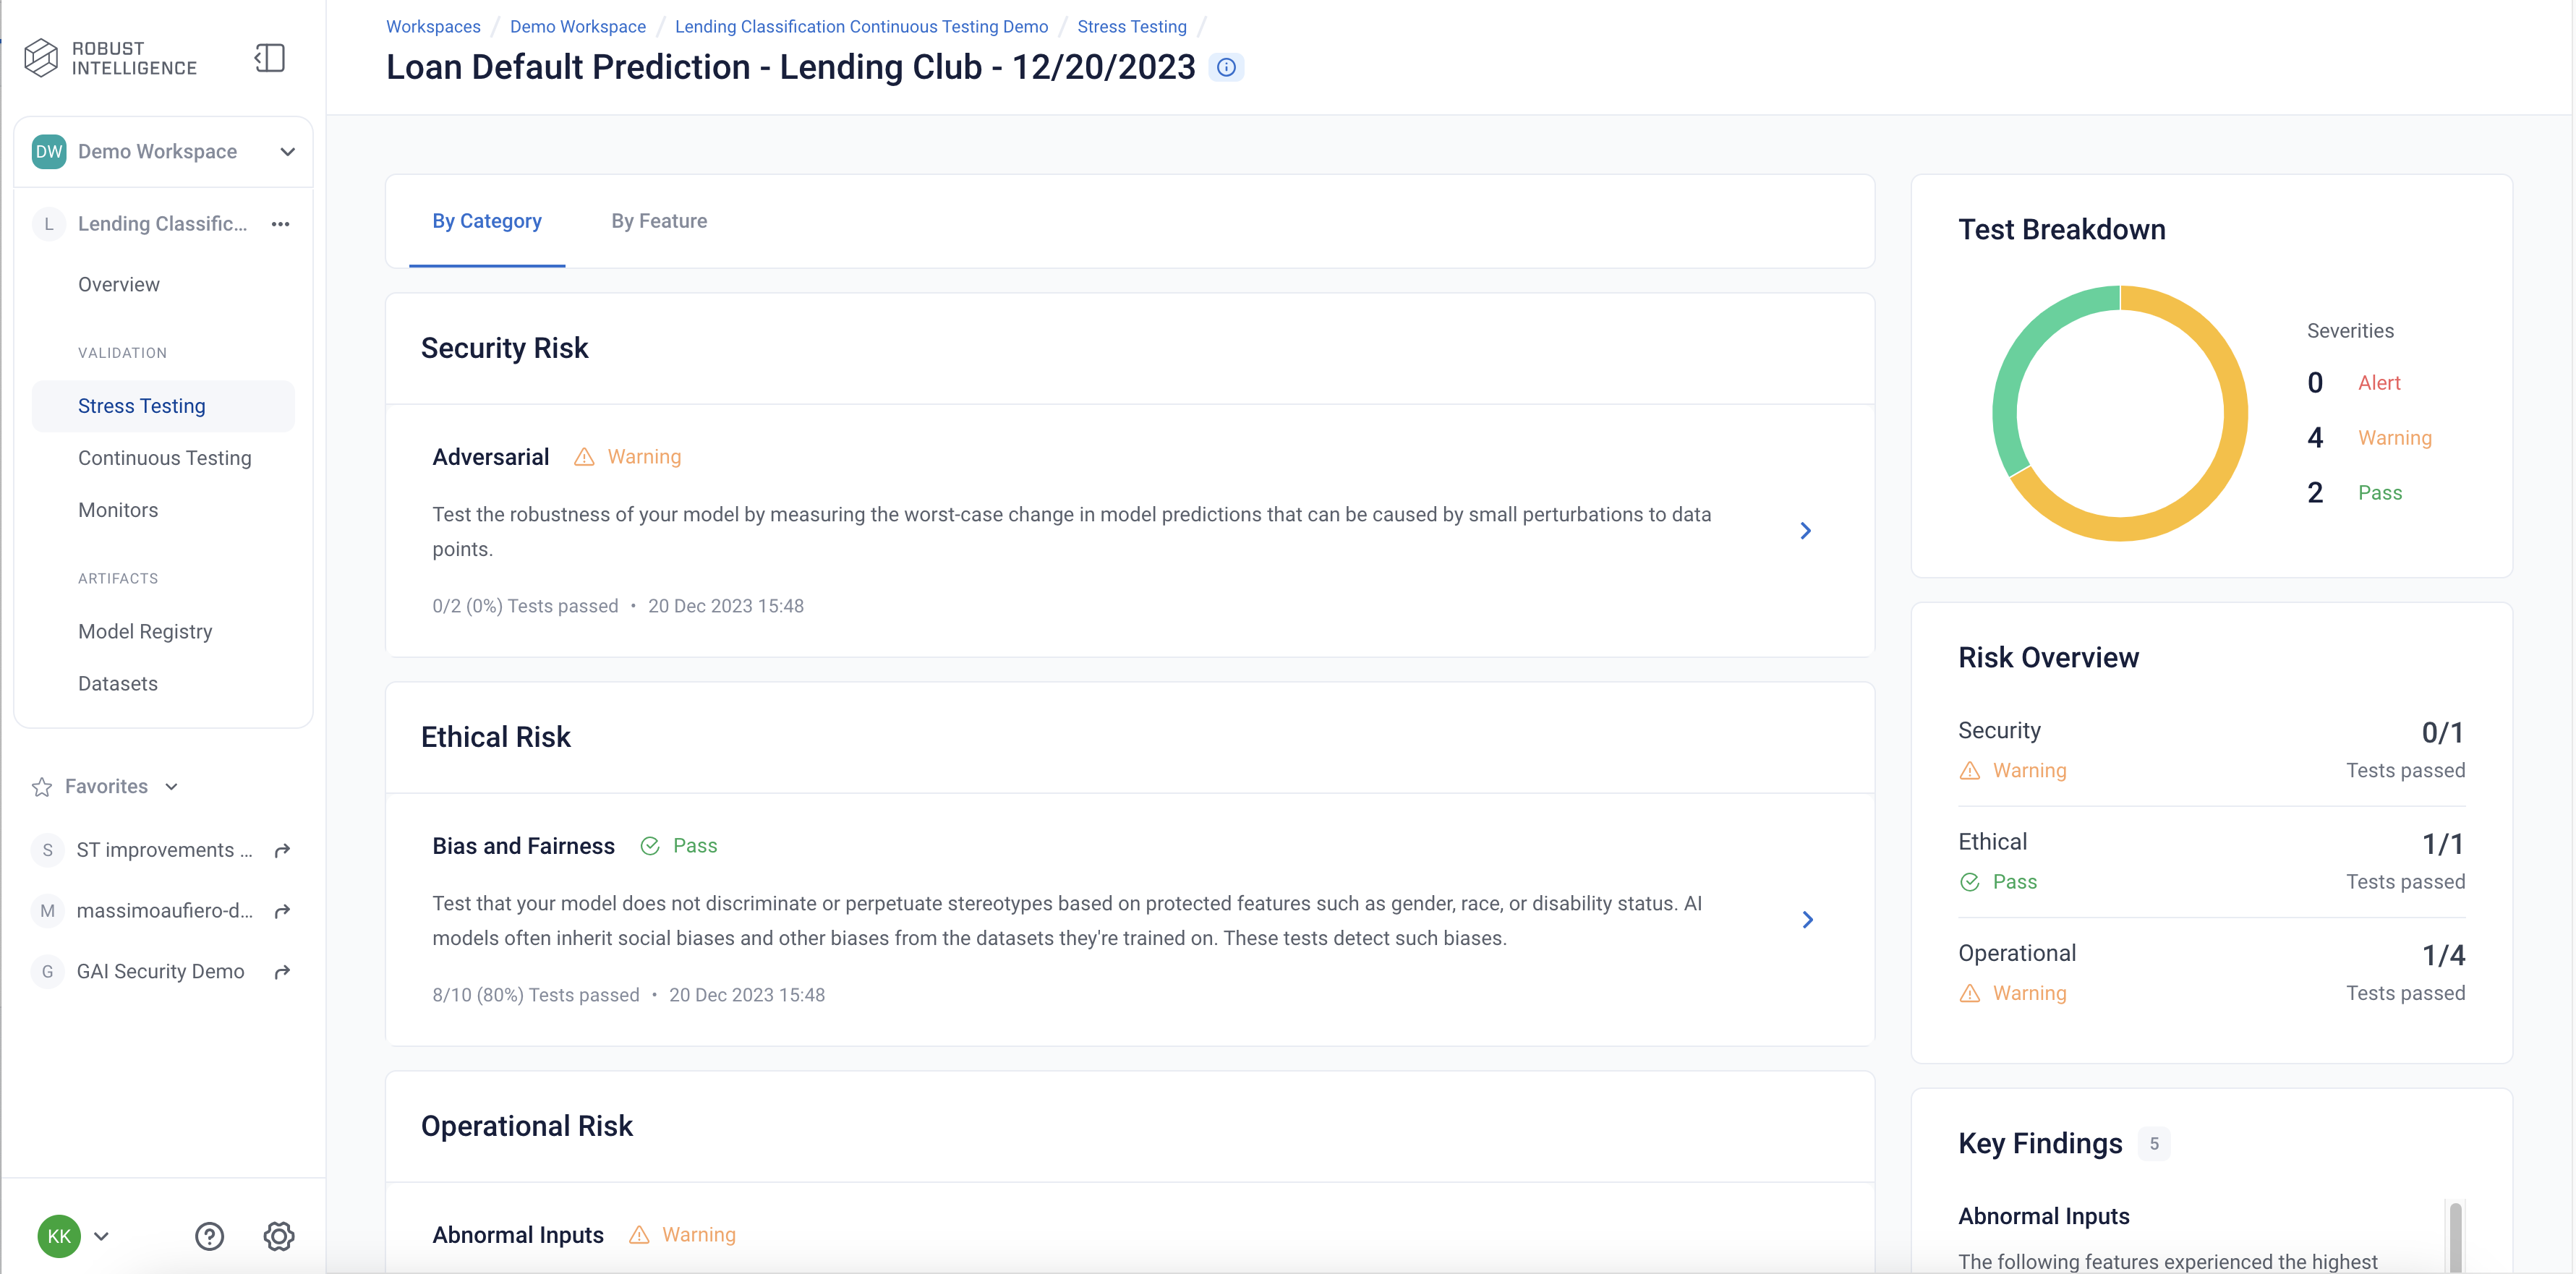
Similar to running RIME Stress Tests in the default setting, we surface an overall distribution of test severities, model metrics, as well as key insights to the right. This test suite comprises a selection of Bias and Fairness tests over any protected features, Attack tests over all features, and Abnormal Inputs tests over all features. These tests align with financial regulatory standards. Lets take a closer look at the Demographic Parity test:
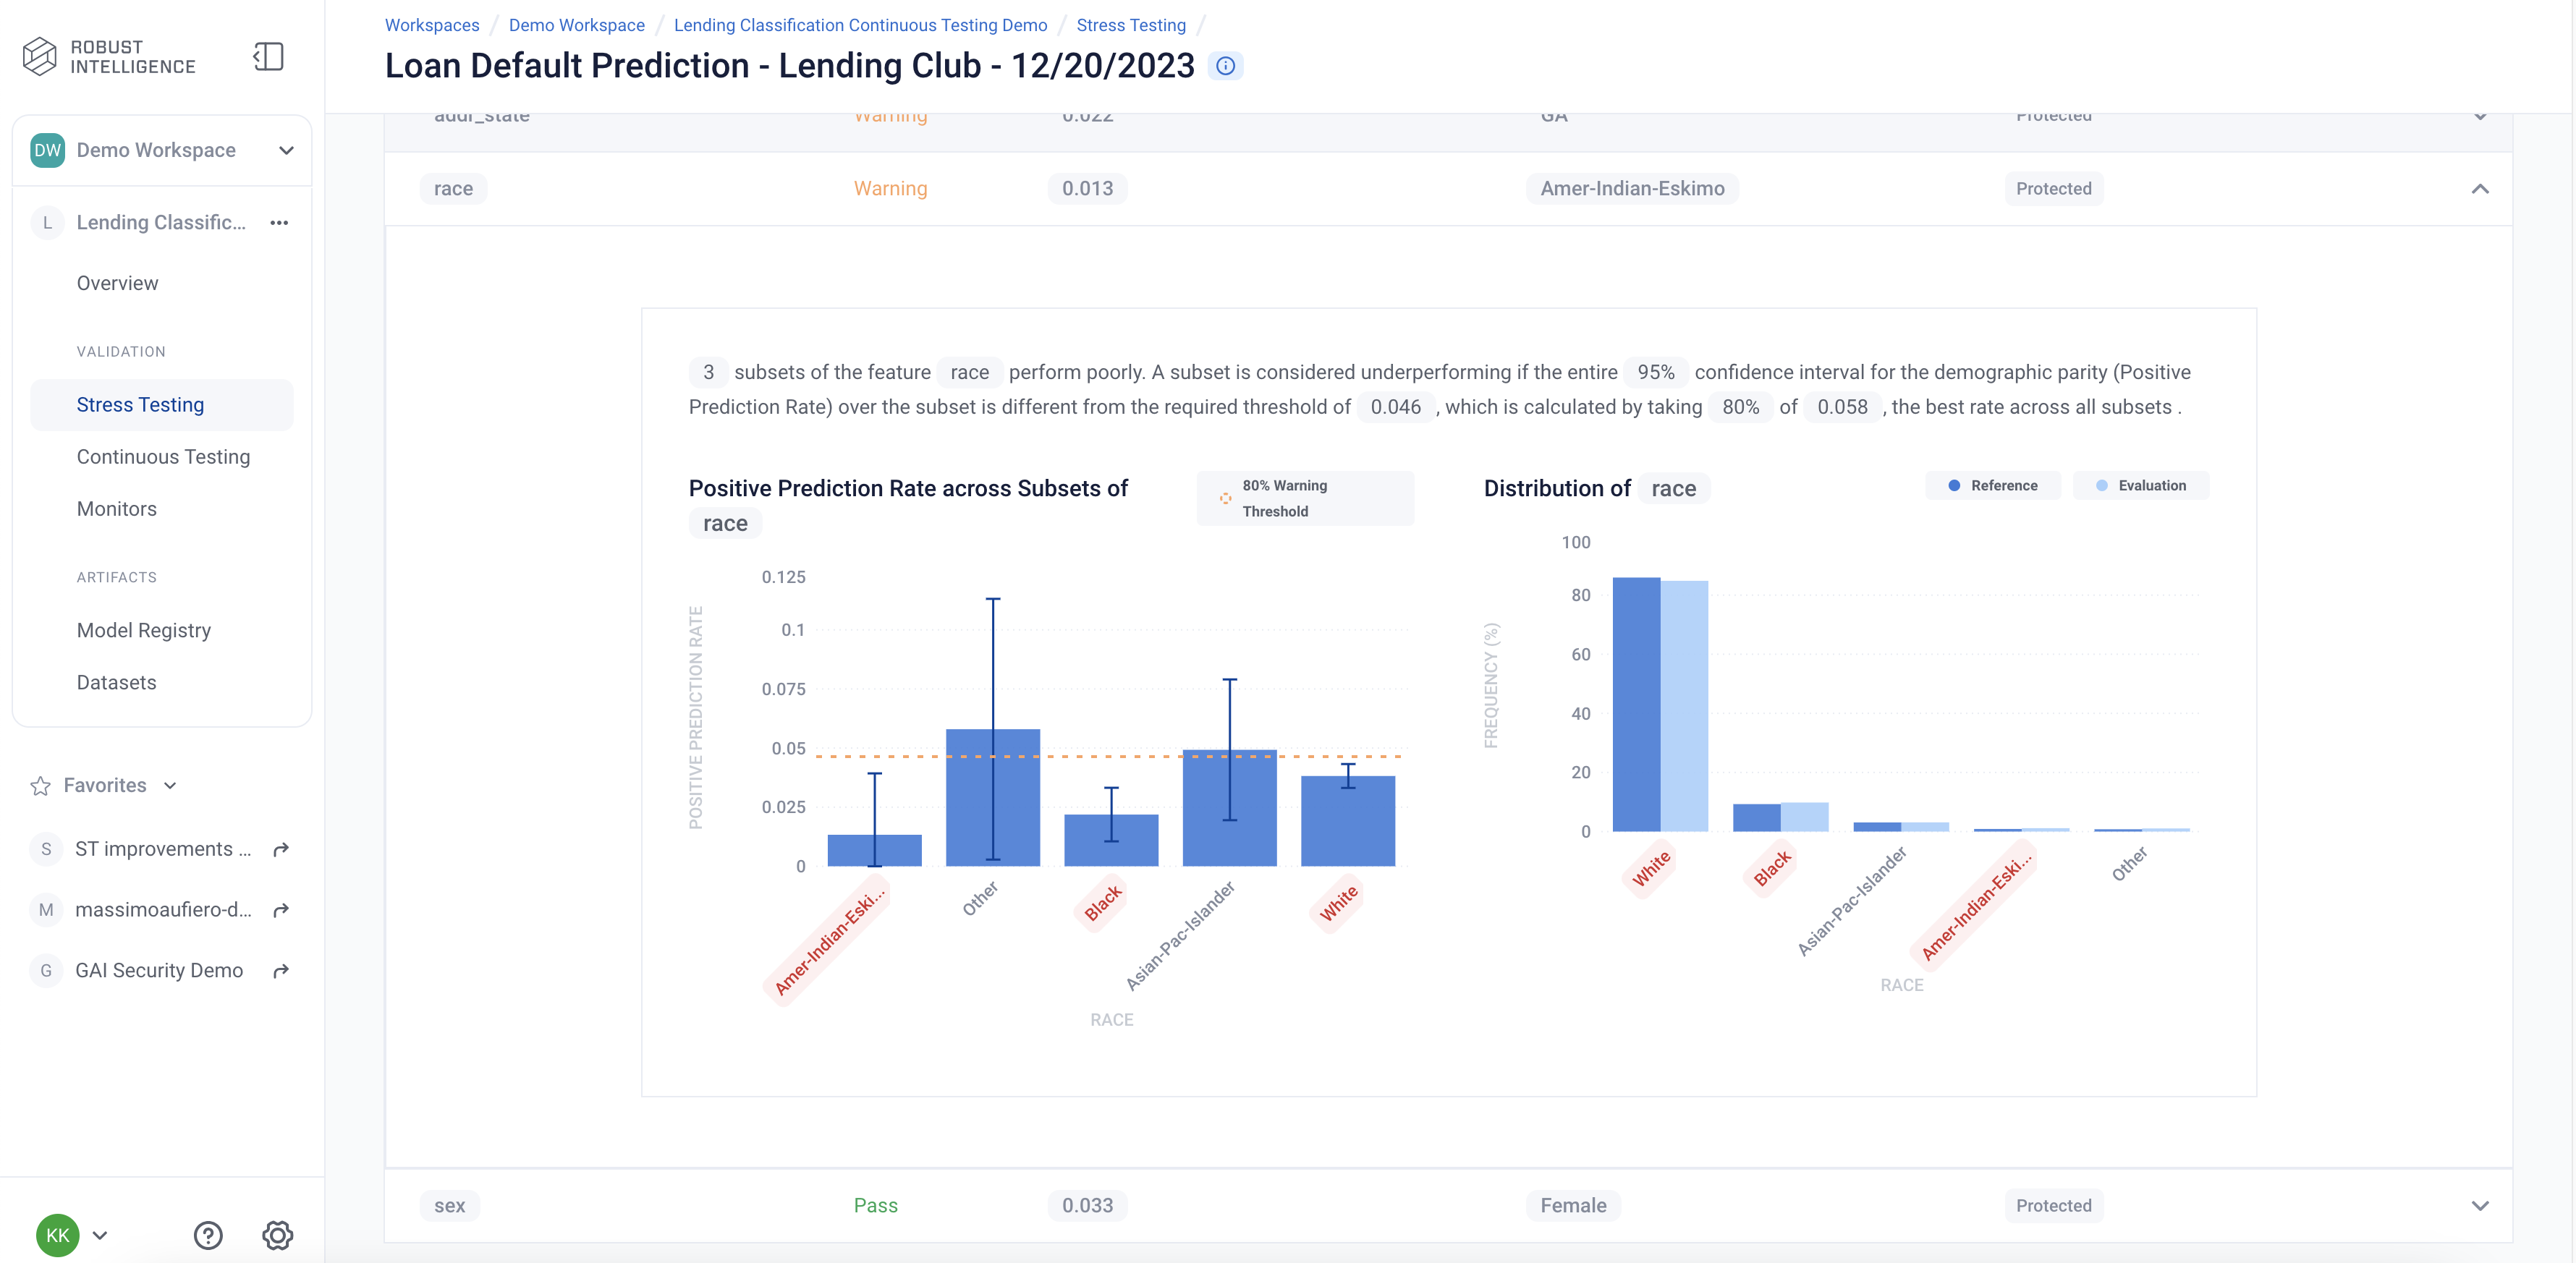
This test is commonly known as the demographic parity or statistical parity test in fairness literature. This test checks whether the model performs equally well across a given subset of rows as it does across the whole dataset. The key detail displays the performance difference between the lowest performing subset and the overall population. The test first splits the dataset into various subsets depending on the quantiles of a given feature column. If the feature is categorical, the data is split based on the feature values. We then test whether the Positive Prediction Rate of model predictions within a specific subset is significantly different than the model prediction Positive Prediction Rate over the entire ‘population’.
We can see that the model fails the demographic parity test for two of the three protected features that we configured.
[ ]:
test_run = stress_job.get_test_run()
test_run
[ ]:
test_case_result = test_run.get_result_df()
test_case_result.head()
Programmatically Querying the Results
RIME not only provides you with an intuitive UI to visualize and explore these results, but also allows you to programmatically query these results. This allows customers to integrate with their MLOps pipeline, log results to experiment management tools like MLFlow, bring automated decision making to their ML practicies, or store these results for future references.
Run the below cell to programmatically query the results. The results are outputed as a pandas dataframe.
Access results at the a test run overview level
[ ]:
test_run_result = test_run.get_result_df()
test_run_result.to_csv("Lending_Test_Run_Results.csv")
test_run_result
Access detailed test results at each individual test cases level.
[ ]:
test_case_result = test_run.get_test_cases_df()
test_case_result.to_csv("Lending_Test_Case_Results.csv")
test_case_result.head()
Deploy to Production and set up AI Continuous Testing
Once you have identified the best stress test run, you can deploy continuous testing for the associated model. Continuous Testing operates on both a datapoint and batch level. It automatically protects your model in real-time from “bad” incoming data and also alerts on statistically significant distributional drift.
In this scenario, the data scientist is short on time and decided to deploy the existing model to production. The data scientist also sets up Continuous Testing to monitor the model. Continuous Testing is automatically configured based on the failures identified by AI Stress testing to protect the tested model in Production.
[ ]:
from datetime import timedelta

# Set up Continuous Testing using previously registered model and dataset IDs.
ct = project.create_ct(model_id, ref_dataset_id, timedelta(days=1))
Uploading a Batch of Production Data & Model Predictions to Continuous Testing
The lending model has been in production for 30 days. Production data and model predictions have been collected and stored for the past 30 days. Now, we will use Continuous Testing to track how the model performed across the last 30 days.
Upload an Incremental Batch of Data
[ ]:
if IS_SAAS:
    prod_s3_path = client.upload_file(
        Path('lending/data/incremental.csv'),
        upload_path=UPLOAD_PATH
    )
    prod_preds_s3_path = client.upload_file(
        Path('lending/data/incremental_preds.csv'),
        upload_path=UPLOAD_PATH
    )
else:
    prod_s3_path = f"{BLOB_STORE_URI}/{UPLOAD_PATH}/data/incremental.csv"
    prod_preds_s3_path = f"{BLOB_STORE_URI}/{UPLOAD_PATH}/data/incremental_preds.csv"

prod_dataset_id = project.register_dataset_from_file(
    f"prod_dataset_{dt}",
    prod_s3_path,
    data_params={
        "label_col": "loan_status",
        "protected_features": ["sex", "race", "addr_state"],
        "timestamp_col": "timestamp"
    }
)
project.register_predictions_from_file(
    prod_dataset_id, model_id, prod_preds_s3_path
)
To run the Bias and Fairness category in Continuous Testing, you will want to specify the Bias and Fairness Category as a continuous test category. This category does not run by default so specifying along with other categories as such is necessary:
[ ]:
project.update_ct_categories(["TEST_CATEGORY_TYPE_MODEL_PERFORMANCE",
                                           "TEST_CATEGORY_TYPE_SUBSET_PERFORMANCE_DEGRADATION",
                                           "TEST_CATEGORY_TYPE_ABNORMAL_INPUTS",
                                           "TEST_CATEGORY_TYPE_DRIFT",
                                           "TEST_CATEGORY_TYPE_BIAS_AND_FAIRNESS"
                                          ])
Run Continuous Testing over Batch of Data
[ ]:
ct_job = ct.start_continuous_test(prod_dataset_id, agent_id=AGENT_ID)
ct_job.get_status(verbose=True, wait_until_finish=True)
ct
Wait for a couple minutes and your results will appear in the UI.
Continuous Testing Overview
The page is the mission control for your model’s production deployment health. In it, you can see the status of continuous test runs, and see their metrics changes over time.
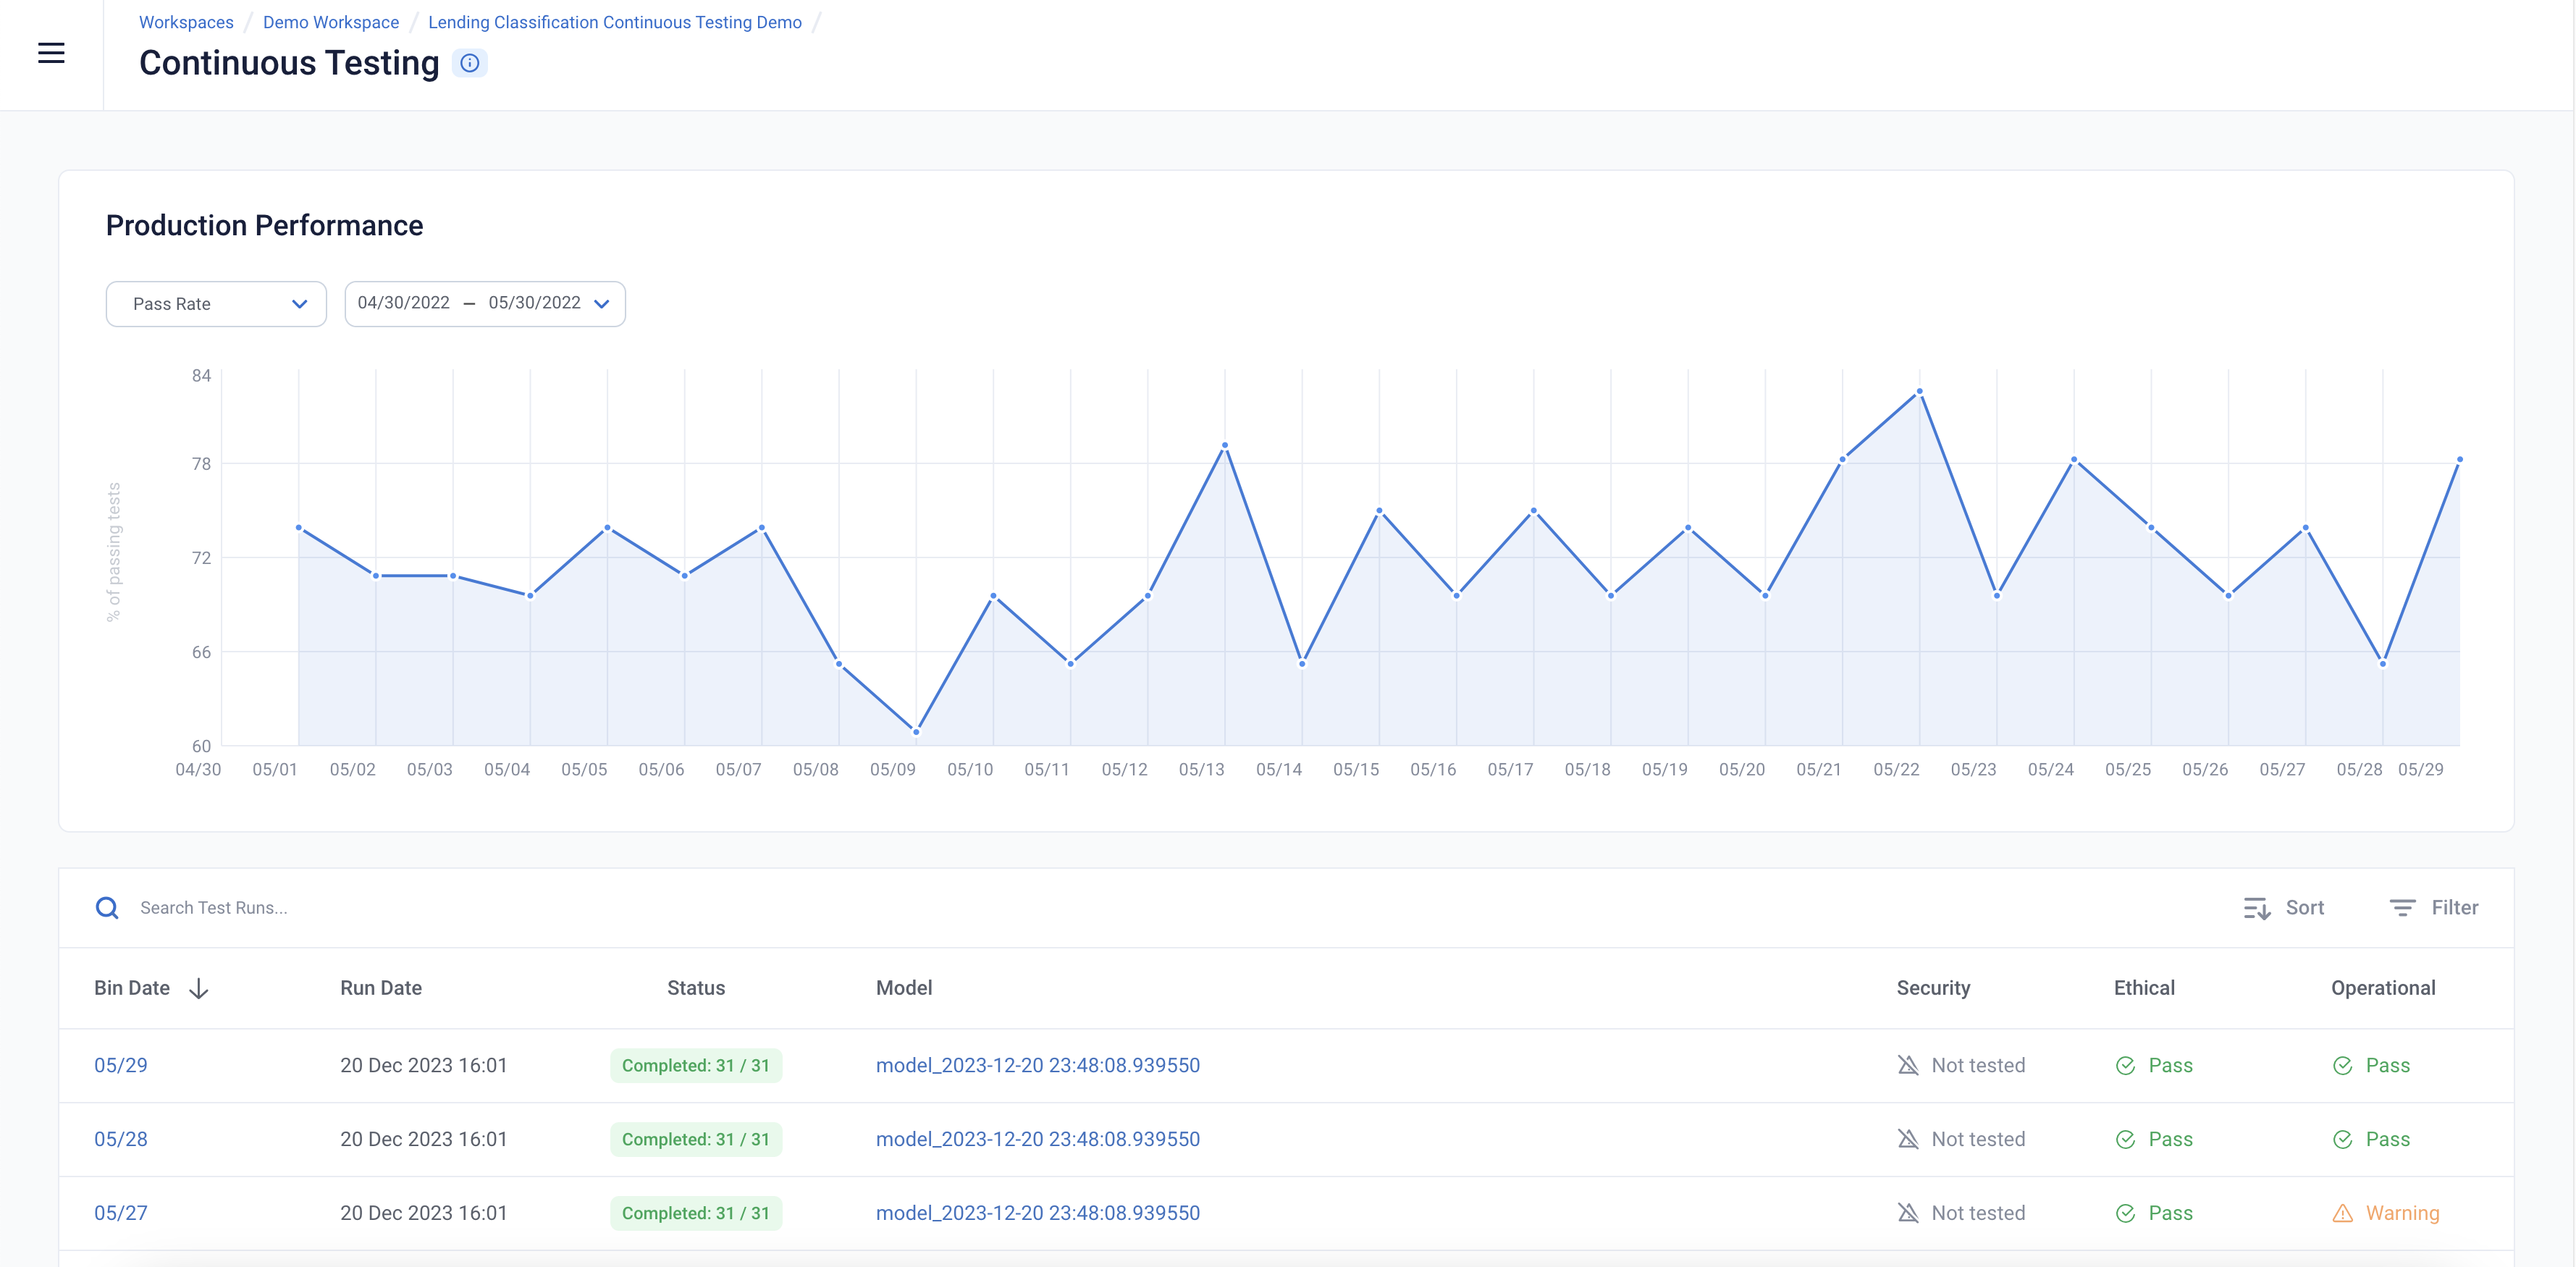
Continuous Test Results
The Continuous Tests operate at the batch level and provide a mechanism to monitor the health of ML deployments in production. They allow the user to understand when errors begin to occur and surface the underlying drivers of such errors.
You can explore the results in the UI by running the below cell and redirecting to the generated link.
[ ]:
ct